
Invoicing in ChilliDB
- jwilson983
- Nov 30, 2021
- 3 min read
Updated: Dec 14, 2021
Summary
ChilliDB has Invoice functionality offered that a user can use to generate an invoice against their clients for any of their products or services. This can be accessed via the Invoice Module under System Menu. Here, users can Create, View, Edit, Save, Send/E-mail, Void, Approve, Expire, Print or Create like Invoice.
Create
Users can Create an Invoice by following a few simple steps. To create an invoice, first go to the Invoice Module by clicking on it in the System Menu. Once in the Invoice Module, users can create an invoice simply by clicking the 'Create' link on the top right-hand side of the page.

On the Invoice Create Page users can fill in the relevant information related to the Invoice they are creating, like Client Detail, Date of creation, Due Date, Reference, and Choose Product/Service. The system will generate an Invoice Number automatically after an invoice is saved and the Invoice Status is changed automatically based on status of that particular invoice, i.e. Draft, Authorised or Declined.

Sending an Invoice
When sending an invoice, users choose recipients from their contacts, write a Subject and Body, and choose a classification before sending it. After all fields are filled in properly, users can Send an invoice to a client.

Users can either use a template to send an invoice or compose their own. In either case, they should make sure that an Invoice Link Token is attached within the email before sending it. This can be selected from the list available in Mail merge tokens.

After an invoice is sent to a client, they will receive both a pdf version and a link to view the invoice via their email.

The recipient can view the invoice by clicking/visiting the link attached to their email. All the fields will be populated with respect to the information entered in the Invoice Create step.
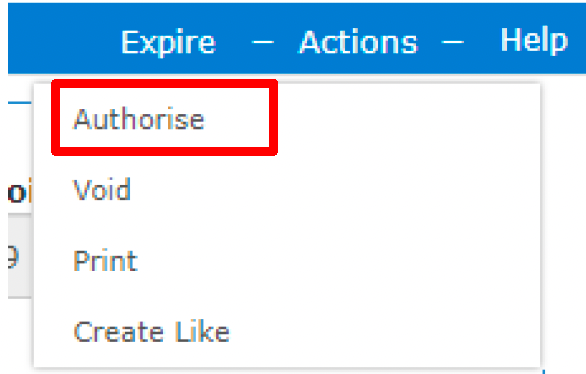
Invoice Display Page Action Menu:
From Invoice Display Page – Action Menu, users can choose to Expire, Authorise, Void, Print and Create Like invoices by selecting Void, Print or Create Like respectively.

Expire
Users can expire newly generated invoices that are still of Draft Status if they wish to. After an invoice is expired, this will be reflected in its status.

Authorise
User can manually Authorise an invoice generated by clicking Authorise from the Action Menu. After Authorise is clicked, the user is directed to a page where they can write a comment, if necessary, and click 'Authorise' to manually Authorise a draft invoice.

Void
By selecting this, users can manually Void an invoice which they created.

By selecting this, users can print the invoice they received. After they click on Print, a reporting view of the Invoice is displayed on a new screen, from where they can View the quote, Print it, Save it as a file in different formats, and/or Email the file.

Create like
Another option available in the Invoice Module is to create another invoice that is a copy of one that already exists by selecting Create Like menu while viewing the invoice you wish to duplicate. Another popup page will appear with the Reference field being empty, allowing users to enter new details. They can add new products or services by clicking Add new Line, as well as Save, Send or Cancel the action. This functions in the same way as when creating a new invoice.

Comments