
SMS Service in ChilliDB
- kkaur488
- Mar 21, 2025
- 4 min read
ChilliDB provides an integrated SMS service that allows organisations to send text messages directly from the system. Before using this feature, administrators must enable SMS within the system settings.
Steps to Enable SMS in ChilliDB
Log in to ChilliDB
Access the system using your administrator credentials.
Go to System Management
Navigate to System > System Management from the top menu.
Locate SMS Settings
Click on the Manage ChilliDB SMS link.

Enable SMS
Select the “Enabled” option from the dropdown menu to activate SMS services.

Once enabled, users with the necessary permissions can start sending SMS messages from within ChilliDB.
By following these steps, you will be able to activate SMS functionality within ChilliDB and allow authorized users to send text messages directly from the system.
Contact Requirements for Sending SMS
Before sending an SMS, it's crucial to ensure that the contact numbers are correctly set up in the system. The system only supports sending SMS messages to mobile-type numbers. This includes:
Personal Mobile
Business Mobile
Custom Mobile Types
Note: Contact numbers saved under phone types such as "Personal Phone" or "Business Phone" will not work for sending SMS messages.
To successfully send SMS messages, ensure that each contact or organisation has at least one valid mobile-type contact number listed in their profile. This ensures they can receive SMS messages sent from the system.
Sending an SMS from ChilliDB.
1. Sending SMS via the Email Icon
One of the easiest ways to send an SMS is by using the Email Icon in the top interface. Here's how to do it:
Steps:
Locate the Email Icon:
At the top of the system interface, click on the Email Icon to access the messaging options.
Select the SMS Option:
From the dropdown menu, choose SMS to proceed with sending a text message.

Open the SMS Interface:
After selecting the SMS option, a new screen will open where you can compose and send your message.

Choose Recipients:
In the SMS interface, you can search for recipients using multiple filtering options:
Any: Search for any contact in the system.
Contact: Select an individual contact.
Contact by Organisation: Find contacts based on their associated organization.
Organisation: Send messages directly to an organization.
Distribution List (DL): Choose from predefined groups of recipients.

Search for Contacts:
Enter a name or relevant details in the search box to find the correct recipient.
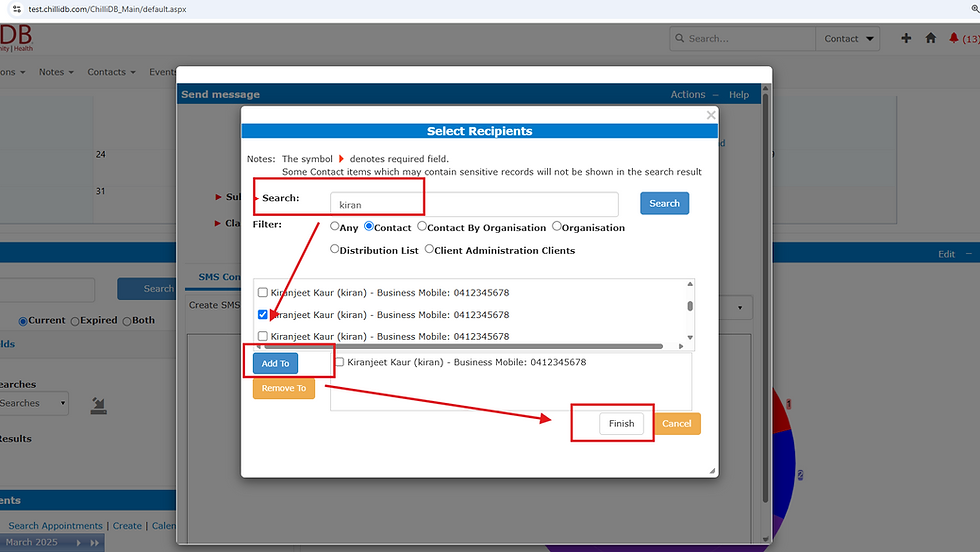
Add Recipients:
Once you've found the contacts, click the Add To button to include them in the message.
Compose the SMS:
After selecting your recipients, type the content of your SMS message.
Send the SMS:
Click the Send button to dispatch the message to the selected mobile numbers.

Sending SMS via Advanced Search
To send an SMS to a specific group of contacts using advanced search, follow these steps:
Steps:
Go to the Contact Module and Search for Contacts
Navigate to the Contact Module in the system.
Open the Advanced Search feature.
Create a new filter based on your search requirements or search contact By Name.
Apply the filter to display the relevant contacts.

Select the Contacts
After applying the filter, a list of relevant contacts will appear.
Check the boxes next to the contacts you want to message.
You can select multiple contacts at once if necessary.
Choose the SMS Option
Once the contacts are selected, click the Chevron Arrow at the top corner of the search results.
From the dropdown menu, select Send Message.
Choose SMS from the list of options.

Compose Your SMS
A new window will open for composing your SMS message.
Write the message content, ensuring it is clear and appropriate for the recipients.

Send the SMS
Once the message is ready, click the Send button to dispatch the SMS to the selected contacts.
For the Organisation Module, the steps are similar. Navigate to the Organisation Module, apply advanced search, select the organisations, and follow the same process to send an SMS.
Sending SMS Using a Distribution List (DL)
A Distribution List (DL) allows you to send SMS messages to a predefined group of contacts.
Here's how to send SMS using a DL:
Steps:
Create or Use an Existing DL:
Create a new Distribution List (DL) or use an existing one. Refer to this guide for creating and managing a DL in ChilliDB: Creating and Maintaining Distribution Lists.
Ensure the DL type is set to SMS to allow SMS communication.

Add Contacts to the DL:
Click on the Create Link in the "Member" tab.
Search for the contacts you want to add to the DL.
Select the mobile number you wish to use for communication and click Done.
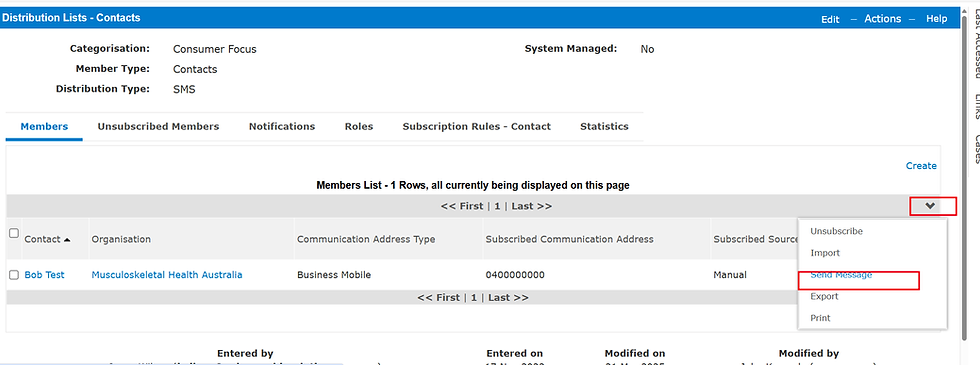
Send SMS to the Entire List:
Once the DL is complete with valid mobile numbers, you can send SMS messages to the entire list by clicking the Chevron Arrow From the dropdown menu, select Send Message or selecting Email Icon > SMS option > Distribution List.
Note: Ensure only mobile numbers are used for the DL. Mark the mobile number as "Available for DL" in the contact details. If this box is unchecked, the number cannot be used for SMS communication in the DL.
Configure Rules in Distribution List Settings:
If you want to make all existing contact numbers available to the Distribution List (DL)without manually updating each contact or organisation, you can do this by using the configuration settings in the DL.
To do this, follow these steps:
Go to Utilities → Distribution Lists → Configure.

Select the Mobile Phone Type:
On the Distribution List Configuration screen, you see the Allow the following 'mobile' phone types to be available for DL section.

Check the box(es) for the mobile phone type(s) you want to make available in the DL.
Choose the Action:
Update Contact mobile phone types that are 'selected' above to be 'available in DL': This will add all contact mobile numbers of the selected type(s) to the DL.
Update Organisation mobile phone types that are 'selected' above to be 'available in DL': This will add all organisation mobile numbers of the selected type(s) to the DL.
If you want to remove mobile numbers, use the "not selected" options.
Save Changes:
You click the "Save" button to apply the changes.

Comments