
Using Azure AD with ChilliDB
- kkaur488
- Sep 21, 2022
- 4 min read
Updated: Sep 27, 2024
Azure Active Directory (Azure AD), Microsoft’s cloud-based identity and access Management service, ensures users can securely sign in and access relevant resources. ChilliDB integration with Azure AD now makes it easy for administrators to manage ChilliDB user accounts directly from Azure AD and prevents users from having to keep track of multiple passwords.
Registering ChilliDB with your Azure AD Account
To enable ChilliDB to authenticate users again Azure AD you need to first register the ChilliDB Application in your Azure Active Directory. The steps to register ChilliDB with an Azure AD account are outlined below:
Under Azure Active Directory choose 'App Registrations'. Then select 'Create New Registrations'.
On the New Registration page, fill out the form as per below, changing the MyOrg in the Redirect URI to your own ChilliDB System Identifier (normally your organization's initials). Once completed click 'Register' to register the app.

After registration is completed, click 'Authentication' on the left-hand side of the screen. On the next screen that is shown, select 'ID Tokens (used for implicit and hybrid flows)' as shown below:

Make a copy of the following items as they will be needed to configure ChilliDB.
Application (client) ID. (from the Overview page for the app)
Directory (tenant) ID. (from the Overview page for the app)
Redirect URIs. (from the Authentication page for the app)
Recording the Azure AD App Registration Details in ChilliDB
Login into your ChilliDB System. Navigate to the System main menu and then choose System Management. From here select the Manage System Configuration link to enter your Azure AD App details.
Enter 'Azure' in the search field and click on 'Filter' to return the Azure configuration items. For each item enter the details from the Azure AD App registration page as follows:
Azure App Registration | ChilliDB configuration |
Application (client) ID | Azure Ad Client Id |
Directory (tenant) ID | Azure Ad Tenant |
Redirect URIs | https://ais.chillidb.com/MyOrg/CORE/System/login.asp |

Once the configuration changes have been applied, you can log out and close the browser.
Note: It wont occur until the server is refreshed that night. As a result, it will be operational the day after activation.
Logging into ChilliDB Using Azure AD for the First Time
Start a browser session and visit your ChilliDB site using its normal web address. If you have not already been authenticated by Microsoft Azure, you will be prompted at this point for your login details. Once successfully authenticated, you will be redirected back to the ChilliDB login page.
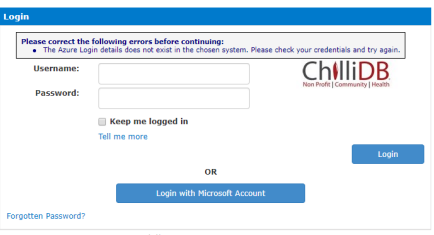
If your Azure AD username (User Principal Name) is not found in your ChilliDB user's list, you will be presented with the login message below. At this point, you should request your ChilliDB administrator creates or updates your user account to have the same name as your Microsoft Azure AD username.
If your Azure AD username is found, you will be automatically logged into ChilliDB.
Synchronizing Contacts' Details
After a user logs into ChilliDB using their Microsoft Azure AD details, the following ChilliDB information will be automatically updated if it differs from the information recorded in Microsoft Azure AD:
- Contacts' first name.
- Contacts' last name.
- Contacts' business email.
If changes are made, the contact modification details will be updated with the date they occurred and the system user as the modifier.
Automatic Creation of ChilliDB User for Azure AD
When using Microsoft Azure AD for authentication, the ChilliDB user and their related contact details can be automatically created if they do not exist in ChilliDB. This prevents the administrator from needing to create the user in both Microsoft Azure AD and ChilliDB. To achieve this, the default role and contact type must be defined in addition to the contact's name in Microsoft Azure AD.
To enable this feature, the following settings are required.
Within Microsoft Azure AD ensure that the following optional claims are exposed:
1. User Given Name
2. User Family Name
To expose these claims view the ChilliDB App Registration in Azure Active Directory you made previously and select 'Token configuration' from the options in the column on the left-hand side.

Click 'Add optional claim' and select 'ID' for the Token type. Then check the 'family_name' and 'given_name' claims:

As these fields are not mandatory in Azure, if they are not completed the 'Name' field will be used to create the ChilliDB contact name by using the first word from this field, and the remaining words will be part of the contact last name. If the 'Name' field has only 1 word, then that will be the contact's first name, and the contact’s last name will be set to Not Specified.
After making the configuration changes in Azure, login into your ChilliDB system. Navigate to the System main menu and select System Management. From here select the Manage System Configuration link to set the following configuration values:
Default Organisation for Contact
Ensure the 'System Owner' item is set to the correct organization. This will be the organization that the contact is associated with when created.
Default Type for Contact
Set the type that will be used for the contact when they are created by associating a type with the 'Contact Add Default Type' item.

Default Role for User
Set the role that will be used for the user when they are created by associating a role with the 'User Add Default Role' item.

Enable Automatic User Creation
Enable automatic user creation by setting the 'Azure Automatic ChilliDB User Creation Enabled' item to 'True'.


Comments